Electric motors make the industrial world go around. They are found in virtually all manufacturing facilities, and are responsible for 64% of all industrial electric power used in the United States.
Why Motors Fail
Your electric motors represent a significant expense. When one fails, costs associated with that motor add up. Those costs include not only the price for repair or replacement of the failed motor but also the cost of lost production time or unplanned downtime. In fact, the cost due to lost production usually dwarfs the motor repair and replacement cost.
As vital as it is to get your motor back up and running, it is as important to find out why it failed in the first place. Discovering the cause of the failure allows you to prevent that problem from causing any future failures. Whether the investigation is done your own maintenance team or by a motor repair, maintenance, or other contractor, it is essential to learn from failures in order to improve your operations’ reliability.

Bearing failure accounts for over half of all electric motor breakdowns. So when you begin to look into why the motor failed, start by looking at the bearings.
Inspecting the Bearings
When the motor arrives for repair, cut and inspect every bearing, especially if a VFD controlled it. Inspecting the bearings provides vital information that indicates the best options for repair. Knowing why the bearing failed and taking steps that prevent it from happening again improves the machine's lifetime performance.
Bearing inspection is also required by AR100-2015, the recommended motor repair practices of EASA (the Electrical Apparatus Service Association). Section 2.2 on Bearings begins, “Bearings should be inspected for failure modes such as spalling, contamination, fretting, fluting, frosting, and scoring or other damage.”
We recommend the following procedure to inspect the bearings for signs of electrical damage due to VFD control. These steps are available in the AEGIS® Handbook. Of course, bearings have many possible failure modes, each of which should also be checked for.
Please Note: Follow established safety precautions and use personal protective equipment including eye protection, hearing protection, face shield, gloves and protective clothing.
1. Inspect the outside and the inside of both bearings. Keep a sample of the lubricant to analyze. When examining the lubricant, look for:
- Contamination
- Signs of excessive heat
- Hardening of grease
- Abnormal coloration (blackened grease)
- Excess grease and oil escaping the bearing
2. Remove seals or shields first, then cut the outer race into halves.
3. Inspect the grease and look for any contamination in the bearing.
- Burnt Grease: Electrical arcing in the motor bearings causes chemical degradation which deteriorates the lubricating capability of the grease.
- Contamination: Besides burning the grease, arcing knocks small metal particles loose from the bearing races or balls. These loose particles become distributed in the grease. These particles are abrasive and cause the bearing to prematurely wear. Burnt bearing grease is blackened and is oftentimes contaminated with metal particles.
New bearing grease is available in many colors. The blue grease is Polyrex EM, commonly found in electric motor bearings.
4. Clean the bearing’s components using a degreaser or solvent.
5. Inspect for evidence of Electrical Discharge Machining (EDM). EDM damage is millions of microscopic electrical pits created when shaft voltage discharges through the motor’s bearings. The voltage voltage across the bearing overcomes the dielectric of the bearing lubrication and arcs through the inner race, through the rolling elements, and to the outer race. These arcs produce microscopic pits, usually between 5 and 10 microns in diameter. Over time, continued pitting causes frosting.
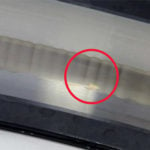
6. Frosting: Frosting appears to be a grey discolored line around all, or part, of the bearing race and evident in both the inner and outer race. Both mechanical wear and EDM can cause that discoloration. Use a microscope to determine whether the line is EDM or mechanically produced.
If the motor was operated by a VFD with no bearing protection installed, there is a high likelihood that the frosting is from EDM.
Fluting Damage: Identified by a distinctive washboard or picket fence pattern. This washboard pattern is called fluting. Fluting can be seen using the naked eye or with 10x magnification.
Take care to identify the correct electrical fluting damage using the observed damage. Sometimes fluting is confused with mechanical bearing damage such as brinelling or false brinelling.
Besides using these recommended practices, please refer to other procedures and bearing failure analysis experts to determine the root cause of the failure.
And always install a new AEGIS Shaft Grounding Ring whenever replacing bearings on an inverter-driven motor. AEGIS Rings have a 2-year extended warranty against bearing fluting damage. No other form of shaft grounding offers a warranty like this.

To learn more about AEGIS shaft grounding and best practices for electrical bearing protection, sign up for a training. We offer monthly live training webinars, and - pandemic restrictions permitting - we can also visit your facility to review your exact application.